Lesson 1

Lesson Objective: In this lesson, we will learn about the basic elements of Pro/ENGINEER, including the different object types, parametric modeling and design intent.

Pro/ENGINEER OBJECT TYPES
Before we get into Pro/ENGINEER and start poking around, it is good to understand the different types of files created and used in Pro/ENGINEER so you will understand the terminology as we go forward.
PARTS – filename.prt
A Part in Pro/ENGINEER is a model that represents an individual product component. Each part is made up of features that define its size, shape, color and function. As each feature is created, a history is kept that defines how the model is made. This is known as Regeneration History.
A successful feature is one that regenerates without any errors or warnings. We will see in a later topic how to deal with these situations.
Parts are the building block of all Pro/ENGINEER objects. Without parts, assemblies and drawings can not exist.
ASSEMBLIES – filename.asm
An Assembly in Pro/ENGINEER is nothing more than a container that points to part files. Parts can be assembled into an assembly (bottom-up design), or created within an assembly (top-down design). In either method, assemblies still rely on the part file to exist.
In assemblies, we can define rigid constraints (such as two objects fastened or welded together), or degree of freedom connections (such as a pin joint or a bearing).
Assemblies also maintain a history of the order in which components were either assembled or created, as well as features that are created in the assembly itself (such as holes or cuts). This history must be successfully regenerated for the assembly to work properly.
DRAWINGS – filename.drw
A Drawing is a two-dimensional representation of a part or assembly file. It relies on either the part or assembly to exist in order to work. Drawings contain views, tables, notes, dimensions, symbols, and other entities designed to fully describe the model for the purpose of manufacturing.
FORMATS – filename.frm
A Format is a file that overlays on a drawing to create the border, title block, revision block, and other company-specific standards that must always appear on that drawing. A Drawing can exist without the actual format file.
SECTIONS – filename.sec
A Section is a two-dimensional sketch that is used to create certain features. Sections are widely used when you are in Part or Assembly mode, and are most often created within the model, not as a separate file.
A section file can be created and re-used many times. In this case the section will be saved out as a stand-alone file. We will see both types of sections in this training guide.
ADDITIONAL FILE TYPES
Pro/ENGINEER also creates other types of files that may appear on your computer. The following table outlines some of these file types and their usage.
|
File Type |
File Ext. |
File Usage |
|
Configuration Files |
.cfg .dtl .map .pcf .pnt .pro .scl .win |
Govern the look, feel and behavior of the application. The extensions are: Model Tree Configuration – CFG, Drawing Setup File – DTL, User Defined Colors – MAP, Plotter Configuration – PCF, Pen Table File – PNT, Main Pro/E Configuration – PRO, System Color File – SCL and Main User Interface Configuration – WIN. These files should not be deleted.
Examples: tree.cfg, e.dtl, color.map, plotter.pcf, plotter.pnt, config.pro, syscol.scl, and config.win. |
|
Error Files |
.crc .err .out |
These files generally do not exist unless there is a problem or potential problem with something in Pro/ENGINEER. Either the model or the setup of Pro/E has an error. The extensions are: Circular Reference – CRC, Bad Geometry – ERR, Config.pro Error – OUT. These files can be deleted.
Examples: 12345.crc, bad_geometry.err, and std.out |
|
Graph |
.gph |
Graph features can be created to drive the creation of some features using an equation. User Defined Features (UDF’s) also use this file extension when saved. These files should not be deleted.
Example: holes.gph |
|
Information |
.inf |
Typically created when performing an information query on an object in Pro/ENGINEER using the Info menu commands. These files can be deleted.
Example: feature.inf |
|
Log Files |
.log |
Certain functions, such as exporting a model to an IGES format, will generate log files. These files can be deleted.
Example: iges_out.log |
|
Markups |
.mrk |
A markup file, or redline file, can be created for parts, assemblies or drawings. These can be used to convey changes electronically. The original model or drawing must exist for these to work. These files should not be deleted.
Example: 12345.mrk |
|
Mass Property |
.m_p |
File created when running a mass property calculation on a part of assembly. These files can be deleted.
Example: 12345.m_p |
|
Symbols |
.sym |
Two-dimensional entities created in a drawing that can be re-used in other drawings. Examples of these include revision hex symbols, part marking symbols, weld symbols, etc. These files should not be deleted.
Example: revision_hex.sym.1 |
|
Tables |
.tbl |
Drawing tables that can be re-used in different drawings. Bill of material tables are a good example. These files should not be deleted.
Example: bom.tbl.1 |
|
Trail Files |
.txt |
A running log file of the current session, from the moment Pro/ENGINEER is opened until the moment it closes. Stored in the c:\trails directory. These files can be deleted.
Example: trail.txt.1 |
If you are not sure whether you can or should delete a certain file, please contact your CAD Administrator for guidance.
PARAMETRIC MODELING
Pro/ENGINEER is a feature-based, parametric solid modeling tool. As described in the first section, when you create a part file, you create a series of features that add or remove material, resulting in a final model. This is what is known as feature-based modeling.
Each feature contains parametric information that defines the size, shape and relationship to other features. For example, when you create an extruded protrusion that is shaped as a rectangular block, you can define the following:
· Length, Width and Depth of block.
· Sketching Plane where you initially sketched the rectangle before extruding it.
· Orientation Plane to define how you look at the sketch when you enter into section mode.
· Dimensional references (such as other geometry edges, planes, surfaces, etc.)
· Direction of the extrude
Parametric information comes in one of the many forms listed below.
· Dimensions
· Relations
· Parameters
· References
· Color (although not to a major degree that might cause a failure of the model if missing)
Some of these parameters directly affect the ability of a model to regenerate successfully, while others affect information about those features. Even if we create features in Pro/ENGINEER that are less constrained (such as Style curves and surfaces), we are still embedding parametric information in these features.
As you learn more about using Pro/ENGINEER, the idea of using parametric information becomes second nature to you, so we won’t spend any more time on it at this early juncture.
DESIGN INTENT
This is, perhaps, the most important thing you should take away from this lesson, if not the entire course. Design intent is the practice of following best practices and standards to generate robust models that react well to change and function the way you intended with the fewest amount of time spent on rework.
Throughout this guide, we will illustrate best ways of approaching modeling in Pro/ENGINEER, and we will also learn all about implementing design intent into a model. For now, consider this…
In traditional 2D cad/drawing packages, as well as many 3D designer tools, the result is an image that best represents the final product being made. With great care and determination, you can end up with a representation that is very exact to the size and shape of the final product, but you will always lack the one thing that defines design intent, the ability to dynamically adapt to the types of changes that come about in a manufacturing environment.
Sure, you can add/delete entities, drag a few curves, etc., but you will not capture the true nature of robust modeling, which is the ability to adapt to change with minimal rework. If you are using Pro/ENGINEER to simply arrive at a size and shape that represents your final product, then you are using the software as a sculptor would use clay, and are not getting the best return on your time.
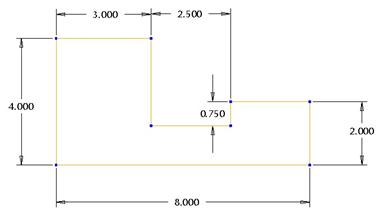
Design intent can be captured in the smallest details, such as the way in which you might dimension a sketch for an extruded protrusion. By dimensioning one way, you can drastically affect the way in which the part can be manufactured (tolerance stack-up affects). Look at the following figure.

In this figure, we can see the overall length is called out as 8.0. If we had an overall tolerance in our model of +0.1in., then the length could vary from 7.9 to 8.1 inches when manufactured.
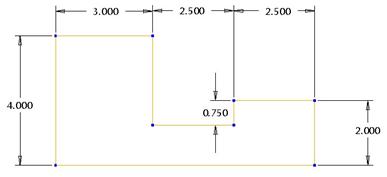
Now, look at the next figure, which still gives the same overall shape and size.

With the same tolerance, the overall length could vary from 7.7 to 8.3 inches, or a difference of +0.2in., which is twice the standard tolerance. This is not to say that the second dimensioning scheme is incorrect, because we might not care about the overall length, and we might be more concerned with the exact width and location of the center groove.
Also, the way in which you dimension can make drastic changes easy or very difficult. You must always anticipate that you will need to change the model. This will affect the decisions you make early on when modeling. For example, in the two figures above, if we were asked to increase the length to 9.000 inches, we could simply change one dimension in the first figure, while we would have to decide which dimension we needed to change in the second figure. One might argue that simply changing the 2.5 dimension to the far right will produce the same result, and they would be correct, however in most cases, such a change is not so cut and dry.
We will see this in more detail as this guide progresses.
COMMON MODELING APPROACH
BOTTOM-UP DESIGN
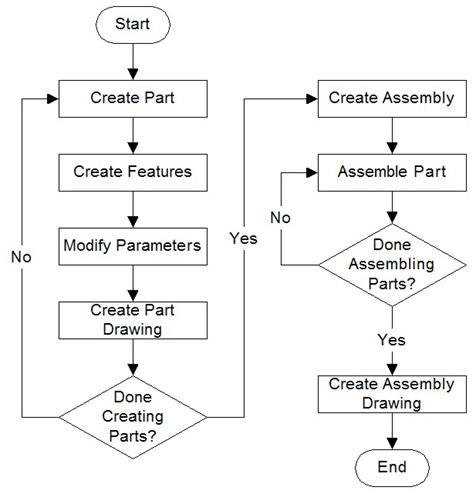
The following flowchart represents the basic steps on bottom-up design.

With Bottom-Up Design, parts are created as stand-alone files with an appropriate drawing. As you create enough parts, you begin to assemble them into an assembly file. Once the assembly is created, you create a drawing for the assembly.
Each individual part has a strong chance of existing independently from each other. The assembly and the drawing files will require the part files to exist. The ability to adapt to change is reduced in this mode, because there is very little tying the parts together. For example, if you design a tote with a lid, there is no guarantee that the tote base and lid will line up. If a dimensional change is made to the base, the lid will probably not fit correctly unless it is updated as well.
TOP-DOWN DESIGN
The following flowchart shows the basic steps to the top-down approach to design.

In contrast to bottom-up design, a top-down approach to design involves building the individual part files in the context of an assembly file. A neutral skeleton part captures all interface information between the components (a 3D layout), then only information needed for a particular part file is passed into that file to be used as a starting point for the geometry.
Once the skeleton geometry is in the individual part, you can work in the part by itself and be confident that it will completely fit when you go back to the assembly (provided that you use the skeleton geometry to mark the location where all of the boundaries and interconnects occur.
A MELTING POT
Ultimately, you can choose to work in either a bottom-up or top-down approach, or choose to perform a hybrid of these two where it suits you. The type of product you are designing may help you choose which method will work better. In this guide, we will demonstrate both methods.
LESSON SUMMARY
Pro/ENGINEER, like many other software packages, produces results that are only as good as the information going in. Using standards and best practices, you can master your design intent to give you robust, easy to change models and drawings.
There are many different files used or created in Pro/ENGINEER, but the most common ones are Parts, Assemblies, Drawings, Sections and Formats. Parts are the building blocks for assemblies and drawings and must always be present for these others to work.
When designing in Pro/ENGINEER, you may choose to build your parts then assemble them (a bottom-up approach to design), or you may wish to build your parts in an assembly to provide a more accurate and complete fit (a top-down approach to design). The type of project will determine which approach works best.