Lesson 23

Lesson Objective: In this lesson, we will learn about the Copy & Paste Tool.
COPY & PASTE USAGE
The Copy & Paste Tool is used to do the following things:
· Surface Copy – Make a quilt surface from a set of selected solid or existing quilt surfaces.
· Surface Transform – Translate or rotate a copy of an existing quilt surface.
· Composite Curve – Create a new curve from the combination of existing stand-alone curves or edges. This was covered in Lesson 10 – Datums Part 2.
· Feature Copy/Move – Copy a feature with new placement references, translate or rotate the copy as needed.
In the next sections, we will show how to use the new Copy & Paste for each feature/operation listed above (with the exception of Composite Curves)
SURFACE COPY
The surface copy creates a new surface quilt by copying existing solid surfaces or quilt surfaces. To demonstrate this functionality, we will open up the part called Copy_Paste1, which will initially look like the following.
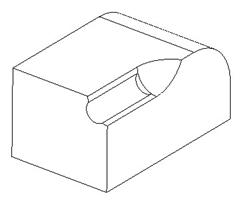
We are going to copy some solid surfaces to make a single quilt surface. To make selection easier, change your selection filter in the lower right corner of the working window to Geometry instead of Smart.
We will now select the following four surfaces using the Ctrl key to select them all at the same time.
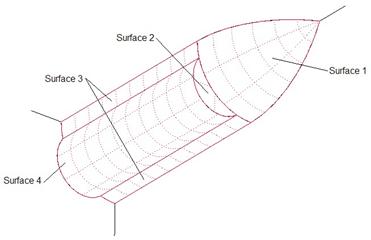
Once all four surfaces are selected, you can use Edit, Copy or just use Ctrl-C on your keyboard to copy the four surfaces. Next, use Edit, Paste or just use Ctrl-V on your keyboard to paste the new surface. It will open up the Copy Surface dashboard, and you should see a preview of the new surface in yellow, as shown below.
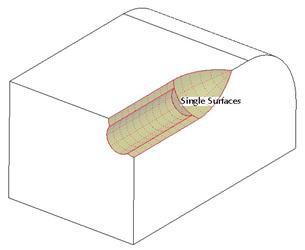
In the dashboard, if you click on the Options slide-up panel, you will still have the ability to exclude internal loops or fill holes, or even copy just inside a selected boundary. The following shows this panel.

Click on the green check mark to complete this surface copy, and you will now see a surface sitting on top of the existing geometry, as shown in the next figure.
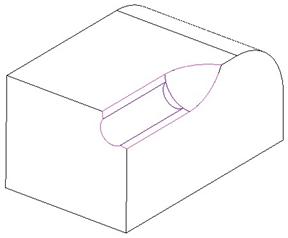
We will continue with this same part for the next operation.
SURFACE TRANSFORM
You use the Copy & Paste tool to move or rotate surfaces as well. NOTE: You must have the surface feature first to rotate or translate it.
Start by changing the selection filter to Quilts to make sure we are only selecting the surface that we just created in the previous section.
Once this surface is selected, use Ctrl-C to copy it into the clipboard. Next, go to the Edit menu, and you will see two Paste commands: Paste and Paste Special.
If you just used Paste, it would make another copy right on top of the existing quilt. To get to the Move or Rotate options, you must use the Paste Special. Therefore, we will select Paste Special. NOTE: Ctrl-V does not work for Paste Special – only Paste.
Once we select “Paste Special” we see the following dashboard.
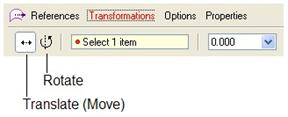
The first two icons determine what type of move operation you are performing. The default is Translate (just called Move in this feature). The second is Rotate. We will start by picking on the Rotate icon.
We must start by picking on an edge or axis about which to rotate. We will select the short edge at the end of the revolved surface, shown highlighted in red in the next figure. When we do this, a default angle of 0.000 appears on the model, as shown.
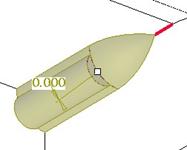
We will enter a value of 270.00 for the angle, which will put it in the correct orientation for what we want. The next figure shows this rotation.
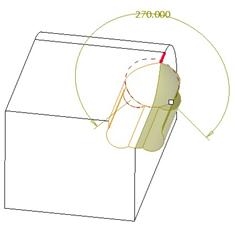
Before we move this surface over to the other side, we will open up two of the different slide-up panels. The first is the Options panel, which shows the following.
![]()
Since this is a surface copy, it actually will keep the original copied surface intact. By default, it hides the original geometry so it appears as if it was just a move/rotate. If you wanted to see the original surface, just uncheck this option. We will leave it hidden.
Next, we will look at the Transformations slide-up panel, which looks like the following.

We can see that we have defined our first move (Move 1) as a Rotate with an angle of 270.000 degrees. To create our translation, we will now click on the New Move option, and then change our pull-down to Move. For our Direction Reference, pick on the edge shown highlighted in the following figure.

Enter a value of 6.000 for the translation amount, and it should preview in the correct location. NOTE: If you have to, enter a -6.000.

Click on the green check mark to complete this surface transform. Our model now looks like the following.

In our model tree, we can see the difference in a Surface Copy versus a Surface Transform, as shown in the next figure.
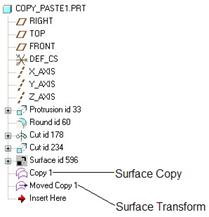
Save and close this model for now – we will come back to it in a later topic.
FEATURE COPY/MOVE
The final Copy & Paste operation that we will show is how to copy an existing solid feature and re-use it in a new location. To demonstrate this, open up the model called Copy_Paste3, which looks like the following.
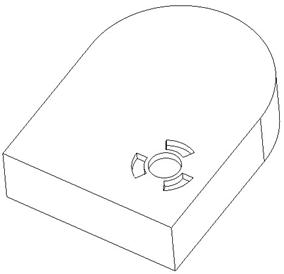
We are going to copy the Extrude 2 feature. When we select this feature in the model tree and then use Ctrl-C, we will go to the Edit menu and see that we have Paste and Paste Special, just like we saw earlier.
We will start with a Paste command, which kicks us into the dashboard for an Extrude 3 feature, as shown in the following figure.
![]()
All of the definitions are identical as the Extrude 2 feature, except for the placement. We will start by right clicking in the working window, and select Edit Internal Sketch. When we do this, the Sketch window appears as follows.
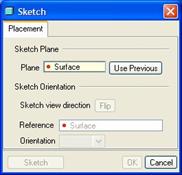
We have to re-select a new sketching plane and Horizontal/Vertical reference. We will click on the top surface of the model where the Extrude 2 feature is. When we do this, accept the default H/V reference of RIGHT facing towards the Right.
Click on the Sketch button to get placed back into sketch mode. Inside the sketch, we will see an outline of the feature as if we had brought in a saved sketch. The only difference is we don’t have the scale or rotate options as we have with a saved sketch. We will place this new sketch approximately next to the existing feature, as shown in the next figure.
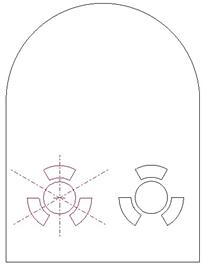
Click with the left mouse button to place the sketch. Dimensions will appear on the model. The dimensions for the sketch itself will be the same as the first feature. The only two dimensions we will change are the locating dimensions, circled in the following figure.

Once your dimensions are the values shown above, click on the blue check mark to get out of sketch mode. This brings us back to the Sketch window, where we will click OK. We will now see the preview of the feature. Click on the green check mark to complete it. Our model now looks like the following.

Now, we are going to demonstrate the Paste Special option. Therefore, re-select the Extrude 2 feature in the model tree, and then use Ctrl-C to copy it. Next, go to Edit, Paste Special menu option. When we do this, we get a window that pops up with three options, as shown in the following figure.
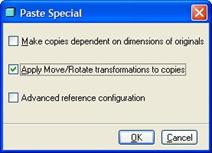
The following options are:
1. Make copies dependent on dimensions of originals. This places the feature right on top of its existing one. If you use Edit Internal Sketch, it will break the dependency on the first one.
2. Apply Move/Rotate transformations to copies. This will allow you to change the location of the feature and rotate it as well as you are copying it.
3. Advanced reference configuration. This brings up a window that shows all of the references used for the first feature to reroute the new copy that you are making.
We are going to select the “Apply Move/Rotate transformations to copies” option, as shown in the previous figure, and then click on OK. When we do this, we can see a bounding box representing the new copied feature, as shown below.

This brings up the transform dashboard that we saw earlier, as shown in the next figure.

We will start by selecting the Rotate icon, and then turn on the datum axes. We will select the A_10 axis at the center of our Extrude 2 feature. When we do this, enter a value of 60 for the rotation angle. Our model should look like the following at this time.

Next, go to the Transformations slide-up panel, and click on the New Move option. We are going to use a “Move” (translate) option this time. For the reference, we are going to select on the bottom edge of our top surface and enter a value of -0.625. Our Panel looks like the following.
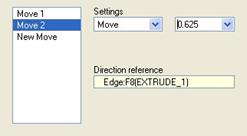
And our model – showing the selected edge looks like:
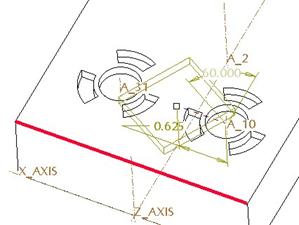
Now, we are going to click on the New Move option again, and this time pick the right edge of the top surface and translate the object 1.5 inches. The model should look like the following.
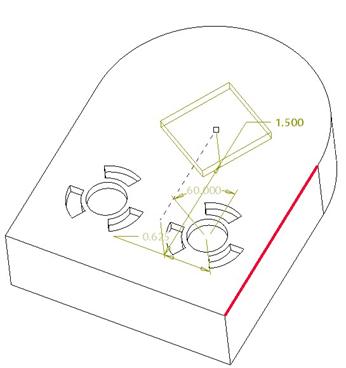
Our panel looks like the following.

Click on the green check mark to complete this feature. The model will look like the following.
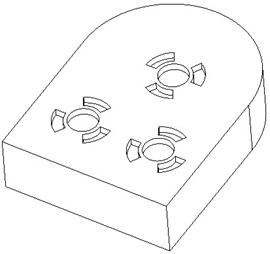
On your own, edit this last feature, and change the horizontal dimension from 0.625 to 0.75 and regenerate the model. Save and close.
LESSON SUMMARY
The Copy & Paste tool is used to create copied surfaces, transformed surfaces, composite curves, and to copy and move existing solid features. NOTE: You can also get to feature copy/move operations through Edit, Feature Operations, Copy.
EXERCISES
Open up the model called Toy_Block, which looks like the following.
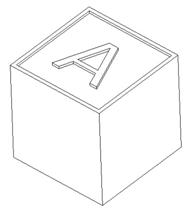
In the model tree, there is a feature called BLOCK, which is the overall square block. The second feature is called LETTER_A, which is an extruded cut that creates the rim around the block and the letter A itself.
The goal for this exercise is to use the Copy and Paste commands to create the rest of the letters (B-F) for this block in the orientations shown in the following figure.
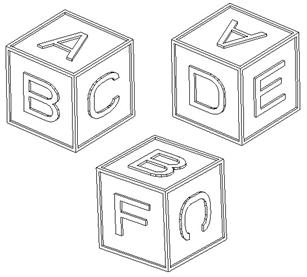
NOTE: You will need to edit the sketch to change the letter each time. Try to use an aspect ratio that centers the letter within the construction square surrounding it.
When done, the model tree should show the names of the features that were added by copying the LETTER_A feature.
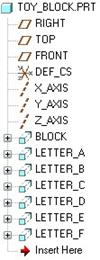
Save and close this model.