Lesson 150

Lesson Objective: In this lesson, we will learn about the Draft Feature, including constant draft, variable draft, split draft, etc.

DRAFT USAGE
You create a draft feature to remove perpendicularity between model surfaces and the parting line (for molded parts). This is such a critical feature for many of the products we design. At the end of this lesson, we will also see how to perform a draft check.
Before we begin, we need to define a few key terms.
DRAFT SURFACES
These are the model surfaces that draft will be applied to. They can be solid surfaces or surfaces created as actual surface features. There are only two rules that are applied to draft surfaces.
· They must be closed in on the top, sides and bottom. Therefore, you can not extrude a single line as a surface, then expect to add draft to that surface, because there is no top, side or bottom surfaces.
· Any tangency with adjacent surfaces may cause the draft to fail. For example, suppose you have a rectangular block. You want to add draft to the front of the block, but you already have a round at the top edge. This front surface can not be used for draft.
DRAFT HINGES
These are planes, planar surfaces, datum curves or model edges that act as the axis of rotation for the drafted surfaces. When defining the draft hinge as a plane or planar surface, be aware of the distance from the surface being drafted, because it does affect it. When defining curves or edges for the draft hinge, you must also supply another entity to define the “Pull Direction” or the direction the part comes out of the mold.
The following figure shows the potential problem with choice of draft hinge when using planes or planar surfaces.

Looking at the figures above, there is a datum curve that shows the original surface that is being selected as the Draft Surface. In the figure on the left, we use the top surface of the model as the Draft Hinge. In the figure on the right, we use a datum plane above the model.
When the draft is calculated, it will project the draft surface up to the draft hinge, then apply the angle at their intersection. We can see that the overall width of the top of the part on the left is still the original length, but we’ve actually made the part bigger on the right.
DRAFT ANGLE
The draft angle is the dimension value applied to the surface. There is a maximum of 30 degrees that can be applied as a draft. If you need more than 30 degrees, you will need to use a different modeling method, such as extrude, sweep, etc.
CREATING DRAFTS
The draft tool is located in the Feature Toolbar, in the top most grouping of blue icons, and looks like the following.
![]()
To demonstrate the new draft tool, we will open up the model entitled Draft1.prt. It will initially look like the following.
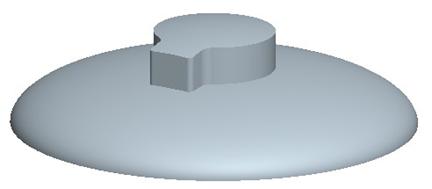
We are going to draft all of the vertical surfaces in this model. Therefore, we start by clicking on the Draft icon in the Feature Toolbar. The dashboard (with the references panel open) looks like the following.
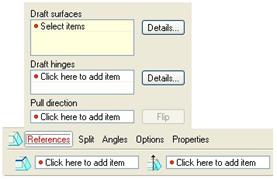
When creating a draft feature, the first thing you specify are the surfaces to be drafted. This is the top field in this References panel, and is activated by default. That is why it is not a field at the bottom of the dashboard.
Therefore, we will select all of the surfaces (using the Ctrl key) that are shown in the next figure.
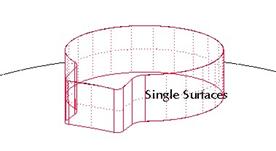
Once all of these surfaces are selected, we need to click into the Draft Hinges field (either in the References panel, or by picking the first field in the dashboard). With this field active, we can pick a planar surface, datum plane, or chain of edges/curves to act as our draft hinge.
Therefore, using selecting techniques learned in lesson 3, we will pick the chain of tangent edges that go around the top, as shown in the next figure.
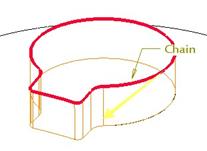
Since we did not use a plane or planar surface as our draft hinge, we must pick a datum plane or other planar surface in the model that is perpendicular to the pull direction. First, however, we must pick in the Pull Direction field to activate it. Once activated, click on the TOP datum plane in the model tree. At this time, all elements are defined, so we can see an angle on our model for the draft, as shown in the following figure.
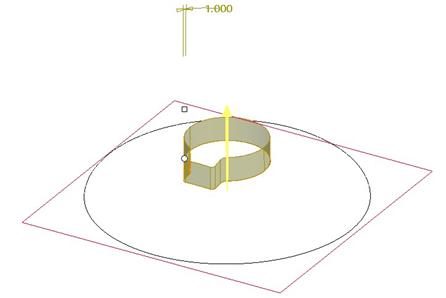
NOTE: If you don’t see the yellow arrow and angle dimension, you have not defined enough references for this draft feature.
We can drag the handle for the angle dimension to dynamically see the draft preview update. We want to make sure we are drafting outwards as we go down from the top of the model. Once your draft is going in the right direction, enter 8.0 as the draft angle.
Our preview now looks like the following.
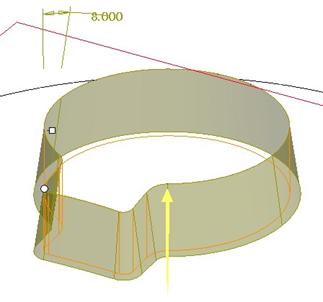
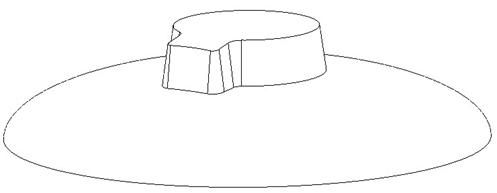
Click on the green check mark to complete this first draft feature. The model will look like the next figure.
Save this model for later, and then close it.
SPLIT
In Pro/ENGINEER, you can split a draft up with datum planes or sketch features. To demonstrate how to split draft, we will open the model entitled Draft2.prt, which looks like the following.
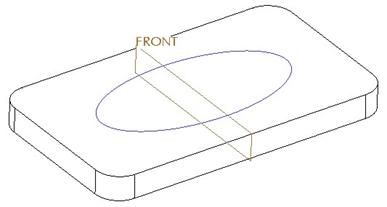
We will start by creating a draft feature. For our draft surface, we will pick the following surface.
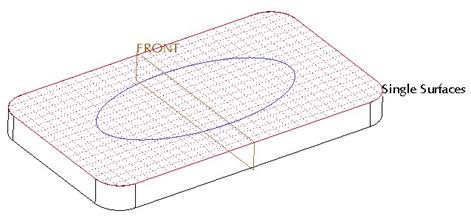
Once this surface is selected, click into the Draft Hinges field, and pick on the FRONT datum plane as our neutral plane. When we do this, our model automatically assumes the pull-direction plane is the same as the existing draft hinge that we picked. We can change this if we want, but we will leave it the way it is. Our model now shows the arrow and angle.
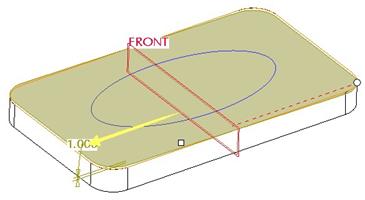
Change the angle value to 5.0, and our model will now look like the following.

So far we haven’t done anything related to splitting up the draft. The fact that we used a plane in the middle of the part as our draft hinge has only resulted in rotating the selected surface about that plane as draft was applied. We will now apply the split.
To do this, open up the Split slide-up panel, which looks like the following.
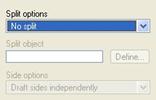
Currently, the Split Options field is set to “No Split”. We will use the pull-down to select a different option. We have two additional options:
1. Split by Draft Hinge – Causes the surface to break at the FRONT datum plane, and each side will be drafted independently.
2. Split by Split Object – We can select or sketch a profile that splits up our part. The object must lie on the surface being drafted, and it must be planar. We can not split using a projected curve on a non-planar surface.
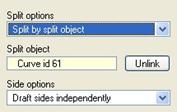
We will choose the Split by Split Object option. This activates the Split Object field, and we will pick on the oval datum curve on the model. When we do this, our Split window looks like the following.
The model currently looks like the following.

We can see a clear independent oval surface in the middle of our existing drafted surface. We can also see two dimensions, one that will control the draft on the large surface, the other on the oval surface.
We are not done yet. We want to remove the draft from the original surface, causing only the oval surface to remain drafted. To do this, we go back to our Split panel. At the bottom, in the “Side Options” field, the current value is Draft sides independently. There are three other options in this pull-down field. These are:
1. Draft Sides Dependently – Both surfaces will have the same, but opposite draft angle. Only one dimension will control both.
2. Draft First Side Only – Only the large surface will contain draft, the oval surface will remain flat.
3. Draft Second Side Only – Only the oval surface will contain draft. The large surface will remain flat.
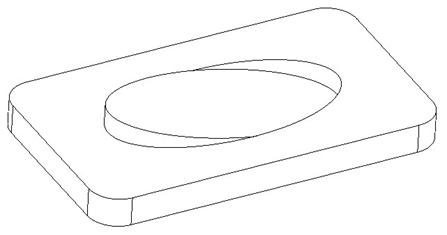
We will use the Draft Second Side Only to give the illusion that we are creating a light switch. When we select this option, our model will look like the following.

We will change the angle to 10.0 degrees, making our switch more pronounced, and then click on the green check mark to complete this draft feature. Our final model looks like the following.
VARIABLE DRAFT
The draft feature also allows you to make variable draft. It works just like the variable round tool. You would right click on the angle dimension and use Add Angle. This creates a second angle.
The biggest difference is that both angles don’t automatically jump to other locations. You will need to drag these angles to the locations you want and then modify their values.
DRAFT ANALYSIS
The Draft Check analysis is a little more streamlined in this release, as are many of the other analysis types. To perform a draft check on this model (Draft2.prt), we would go to Analysis, Geometry, Draft from the Menu Bar. This brings up the following interface.
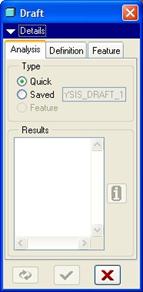
We can run a quick check on the model, or we can retrieve a saved analysis that we have already created. We will keep the Quick option selected, and the click on the Definition tab at the top. This will bring up the following.
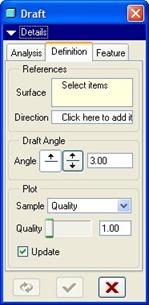
By default, we are being prompted to pick on the surfaces to check. To check an entire part, we hold the mouse cursor over the model so that one of the features highlights in blue. Then, we continue to click (slowly) with our right mouse button until the entire model highlights in blue, and we see our status window (or the tool tip) indicate SolidGeom, as shown in the following figure.
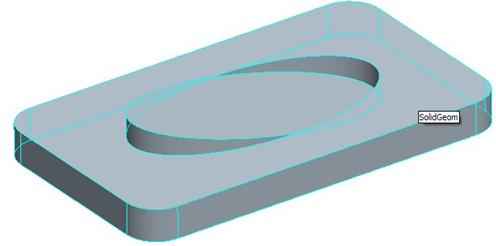
Once we see this condition, click with the left mouse button to select the entire part. Now, we will skip over the next field and go straight to the Draft Angle section in our window. For this, we are going to pick on the icon that has the arrows going in both directions (this indicates the “Both Sides” option). Then, we are going to enter the minimum draft we are checking against. In this model, we are going to check against 5.0 degrees.
Once we have entered this data, we will pick in the Direction field and select on a plane or planar surface that is perpendicular to the pull direction. In our example we will pick on the top flat surface (not the oval surface).
Our window looks like the following once we have done all of this.
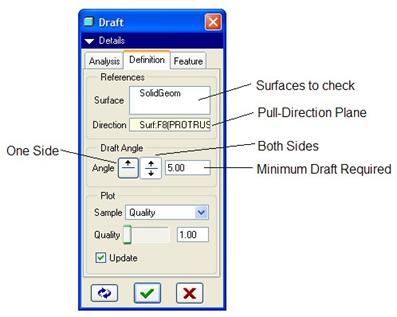
Our model will be shaded in colors, as shown below.
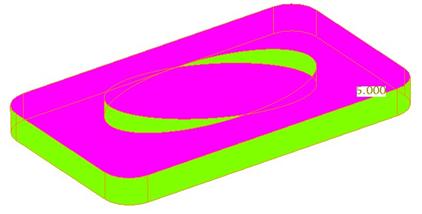
These colors correspond to the legend that pops up at the left of our screen, as shown in the next figure.

There are three black triangles on the left side of this legend. The top and bottom represent the positive and negative draft that we are measuring (since we picked “Both sides”). The max/min value is 5/-5 respectively.
The center black triangle represents no draft (0.0), and this corresponds to the lime green color. On our model, we can see that any surface in this green color has no draft whatsoever. Any surface that is magenta or blue is at least 5.0 degrees, and any other colors are between 0 and 5 or 0 and -5.
LESSON SUMMARY
The draft tool is absolutely necessary when working with plastic molded parts (or any molded parts for that matter). You will need to choose your Draft Hinge wisely to avoid growing or shrinking the model.
Always perform the basic draft check outlined in this lesson to ensure you have enough draft on your model.
EXERCISES
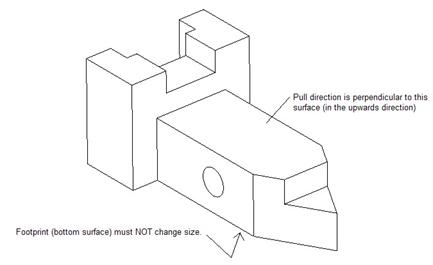
Open up your Safety_Key part file that you created back in Lesson 5. Perform a draft check to make sure you have at least 2 degrees of draft on every surface of the model. Add draft where necessary. Assume the pull direction is perpendicular to the following surface.
