Lesson 6

Lesson Objective: In this lesson, we will learn about the extrude feature, and the different depth options available.

EXTRUDE DEFINITION
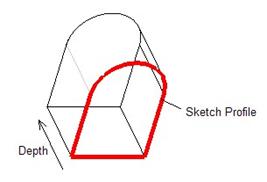
An Extrude is created by taking a sketch and pulling that sketch in a straight direction to a specified depth. The following figure illustrates this concept.
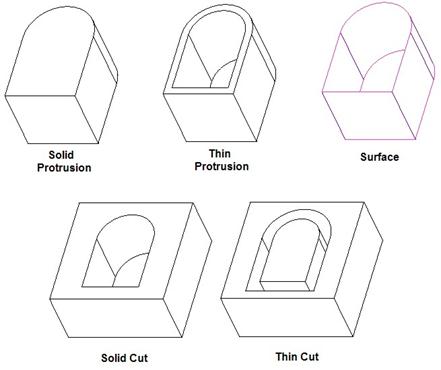
Within the extrude feature, you can create solid protrusions, thin protrusions, solid cuts, thin cuts or surfaces, and can switch back and forth between these. The following figure shows these different types of entities.
We will see these entity types in many of the common features in Pro/ENGINEER. There are two different ways to approach an extrude feature. The first approach assumes you have no sketch features in your model that you will use as the basis for the extrude. The second assumes you are going to use a sketch feature already in your model.
EXTRUDE STEPS
The steps to create an extrude feature are as follows:
1.
Use Insert,
Extrude from the Menu Bar, or select on the ![]() icon in the Feature Toolbar.
icon in the Feature Toolbar.
2.
Select one of
the feature types: Solid ( ![]() ), Surface (
), Surface ( ![]() ), Cut (
), Cut ( ![]() ), and/or Thin (
), and/or Thin ( ![]() ).
).
3. If no sketch feature was selected, hold down the Right Mouse Button, and select Define Internal Sketch.
4. Select a sketching plane, horizontal/vertical reference and orientation in the Sketch dialog box.
5. Sketch the profile to be extruded, followed by the blue check mark in sketcher mode.
6. Select depth option and enter depth value (if blind).
7. Accept the feature.
If you are starting off with an existing sketch feature as the basis for the extrude feature, the steps are as follows:
1. Select the Sketch Feature (either in the working window, or in the model tree).
2.
Use Insert,
Extrude from the Menu Bar, or select on the ![]() icon in the Feature Toolbar.
icon in the Feature Toolbar.
3.
Select one of
the feature types: Solid ( ![]() ), Surface (
), Surface ( ![]() ), Cut (
), Cut ( ![]() ), and/or Thin (
), and/or Thin ( ![]() ).
).
4. Select the depth option and enter depth value (if blind).
5. Accept the feature.
EXAMPLE 1 – Internal Sketch
In this example, we will assume that we do not have a sketch feature to pick on to create the extrude feature. To begin, create a new part called Safety_Key. We will use the Startpart_English as the template for this part since our dimensions will be in inches.
We will start off with a protrusion (Solid Extrude)
feature. Therefore, click on the extrude icon ( ![]() ), or use Insert, Extrude from
the Menu Bar. Down in the lower left corner of our interface, the dashboard
for the Extrude feature will open up. It looks like the following figure.
), or use Insert, Extrude from
the Menu Bar. Down in the lower left corner of our interface, the dashboard
for the Extrude feature will open up. It looks like the following figure.
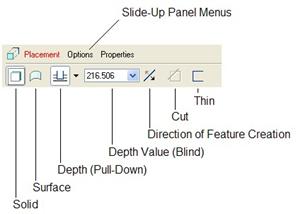
Along the bottom row of this dashboard are the different feature types, depth and direction options. Along the top of this dashboard are feature-specific menu options. These menu options are referred to as “Slide-Up Panels”, because they open up into little panels of information when you click on them.
By default, the solid option is selected for the Extrude feature. Since this is the first solid feature in the entire model, the Cut option is currently not available.
We will leave the default of Solid selected, and now it is time to create the sketch for our first extrude feature. We will therefore hold the Right Mouse Button down over the working window, and select Define Internal Sketch, as shown in the next figure.
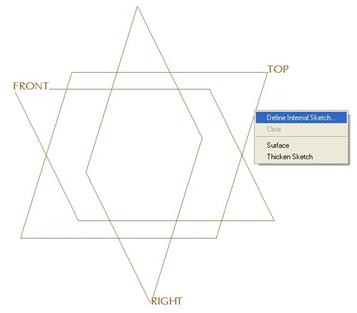
This will bring up the Sketch window, as we can see in the next figure.
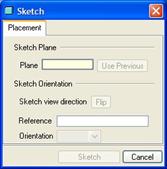
We will select the TOP datum plane as our sketching plane, and accept the default select of the RIGHT datum plane facing towards the Right. Click on the Sketch button to enter into the sketch.
In sketch mode, sketch a horizontal centerline on the existing horizontal reference line. Then, sketch a 1.12” x 2.4” rectangle to the right of the vertical reference line, symmetric about the centerline, as shown below.
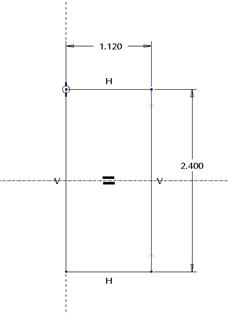
When you click on the blue check mark to complete this sketch, go to a default orientation to see the dynamic preview better.
If we look at the dynamic preview of our extrude feature we can see the following.
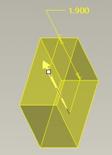
For the extrude feature, you will see a yellow outline of the feature being created. There is a yellow arrow that indicates the direction the feature is going. If you simply click on this arrow, you can flip it to the other direction.
There is also a depth dimension (for blind extruded features). At the end of the dimension, there is a white square. This is a drag handle. You can use your left mouse button and drag the depth value dynamically.
To change the depth value, you can either enter the value in the depth field in the dashboard, or double-click on the yellow dimension on your model. We will enter the depth of 1.9, as shown in the previous figure.
The lower right side of our working window is also associated with the dashboard, and has the following icons.
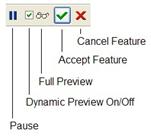
I recommend always leaving the Dynamic Preview On (Checked). We will talk about the pause feature a little later – but for now, understand that it is associated with “On-The-Fly” Datum creation.
You can use the full preview (eyeglasses) to see what the final model would look like when the feature is done. We are going to click on the Accept Feature icon to complete this first protrusion. Our model looks like the following.
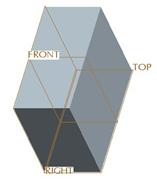
Now, we will create another extrude feature that will remove material from this block. Start by selecting the extrude icon again. This time, however, we want to make sure that we select the Cut icon in the dashboard, as shown below.

NOTE: When you select the Cut option, another icon appears at the end of the dashboard that allows you to specify which side of the sketch the material is being removed from, as we can see in the previous figure.
Once we have selected Solid (by default) and Cut, we will use the Right Mouse Button to select Define Internal Sketch. We want to use the same sketching plane that we did before (TOP datum plane). Instead of selecting it again, we will click on the Use Previous button in the Sketch window. This will automatically select the last sketching plane, H/V reference, and orientation that was used for the previous feature.
Click on Sketch to get into sketch mode, and sketch the following 1.4” x .5” rectangle.
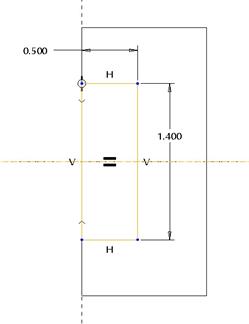
Once you sketch the rectangle, click on the blue check mark to complete the sketch, and then go to a default view to see the dynamic preview better.
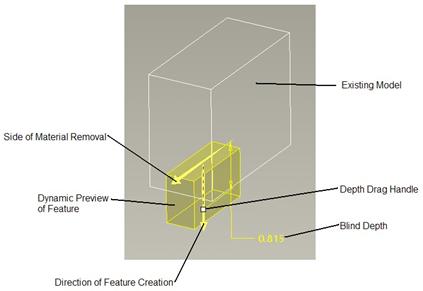
From the previous figure, we can see that our cut is going in the wrong direction. We can also see an additional arrow. One of the yellow arrows indicates the direction the feature is going, while the other one shows up for cuts to represent the side of the sketch from which the material is being removed.
In this case, we will click on the arrow to flip the direction of feature creation and then we need to change our depth option.
In the Dashboard, we will click on the arrow to see the different depth options, as shown in the next figure.
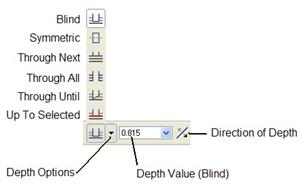
Currently, we have the Blind depth option selected. We want to use the Through All depth option. NOTE: We could have flipped the direction of feature creation by clicking on the icon to the right of the depth value, as indicated in the figure above.
Once you select the Through All depth option, the depth value should gray out, and our dynamic preview will extend beyond the top of the part to indicate that it is going all the way through the model, as shown in the next figure.
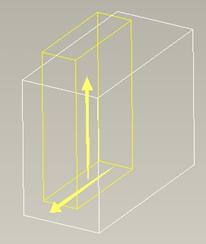
The depth dimension and drag handle have also disappeared from the preview, since we can not change the depth value with the “Through All” option. Now, we can click on the green check mark icon to accept this cut feature. The model now looks like the following.
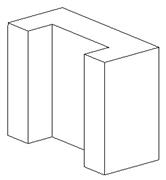
The model tree will only indicate Extrude features with an incremental number.
The biggest reason it only says “Extrude #” is the fact that we could change the cut to a protrusion or a surface, etc. at a later time, and therefore, the “Extrude” name is generic enough to allow for this flexibility.
Save and close this model – we will return to complete it in the exercise.
EXAMPLE 2 – EXTERNAL SKETCH
In this example, we will see how to use a sketch feature to create an extrude feature. To demonstrate this, we will start by opening up the Plate_Layout part that we created in Lesson 5.
If you recall – this part consists of a single sketch feature, and it looks like the following from a TOP view with the datum planes turned off.
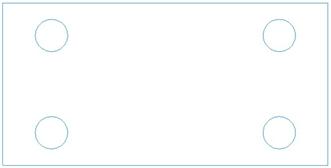
We will start by selecting the sketch feature (either by picking it in the Working Window, or in the Model Tree). Next, we will pick on the extrude icon.
Right away, we will notice a dynamic preview of the feature when we are placed into the extrude feature, as shown below.
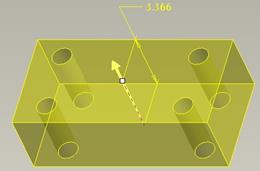
We will change the depth value to 2.0 and then click on the green check mark. Our model looks like the following.
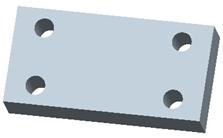
IMPORTANT: When you select on a sketch feature, the entire sketch is used. In this case we created a plate with four holes in it. Even if we were to select only portions of this sketch feature (as we learned in Lesson 3), it still uses the entire sketch. Therefore, if we had wanted to have a plate with four cylindrical feet sticking out (or if we had wanted the holes to be blind instead of through all) we would have to make the holes as a separate sketch feature, or we could create regular extrude features with internal sketches and use the “Use Edge” command to pick only the pieces from the sketch that we wanted.
When we use a sketch feature to create a solid feature, it becomes hidden in the model tree, as shown in the next figure.
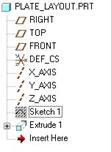
A hidden feature in the model tree has a shaded block around its icon, as shown above. We can unhide this feature and continue to use it for more features if we needed to. The Extrude feature is completely associative with the sketch feature. If we make a change to the sketch, it updates the extrude.
There is an option in Extrude mode when we use an external sketch to break that associativity. In the dashboard, we would pick on the Placement slide-up panel, and click on the Unlink button, as shown below.

When you click on the Unlink button, you will get the following prompt.
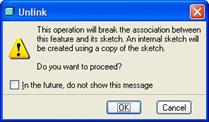
Click on OK to finish the unlink. In the slide-up panel, we can now see an Edit button that replaces the “Unlink” button, as shown below.

When you click on Edit you are brought into the standard Sketch window to redefine the placement and sketch of this feature. It will automatically take on the sketching plane, H/V reference and orientation of the original sketch feature (in this case the TOP datum plane as the sketching plane, and the RIGHT plane facing towards the Right).
If we make a change to the original sketch feature after the Unlink, we will not see the extrude feature update.
DEPTH OPTIONS
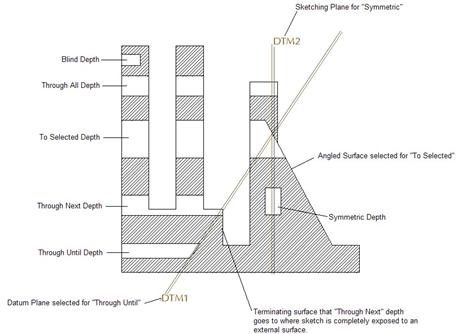
There are six depth options that are available at different times when creating extruded features. These are:
·
Blind – ![]() Extrudes a section from the sketching
plane by the specified depth value. Specifying a negative depth value flips
the depth direction.
Extrudes a section from the sketching
plane by the specified depth value. Specifying a negative depth value flips
the depth direction.
·
Symmetric – ![]() Extrudes a section on each side of the
sketching plane by half of the specified depth value. Negative values are not
allowed.
Extrudes a section on each side of the
sketching plane by half of the specified depth value. Negative values are not
allowed.
·
Through
Next – ![]() Extrudes a section to
the next surface. Use this option to terminate a feature at the first surface
the entire sketch profile reaches. You cannot use datum planes as terminating
surfaces.
Extrudes a section to
the next surface. Use this option to terminate a feature at the first surface
the entire sketch profile reaches. You cannot use datum planes as terminating
surfaces.
·
Through
All – ![]() Extrudes a section to
intersect with all surfaces. Use this option to terminate a feature at the
last surface it reaches.
Extrudes a section to
intersect with all surfaces. Use this option to terminate a feature at the
last surface it reaches.
·
Through
Until – ![]() Extrudes a section to
intersect with a selected surface or plane. You can use any part surface,
datum plane, quilt composed of several surfaces or another component in an
assembly.
Extrudes a section to
intersect with a selected surface or plane. You can use any part surface,
datum plane, quilt composed of several surfaces or another component in an
assembly.
·
To
Selected – ![]() Extrudes a section to
a selected point, curve, plane or surface.
Extrudes a section to
a selected point, curve, plane or surface.
The following figure illustrates these depth option.
EXTRUDED SURFACE
You go about creating the extrude feature the same way you have so far. When you get into the dashboard, you will select on the Surface option.
When you create your sketch, you can have an open section or a closed section. The following figures show the difference between an open section and a closed, and their resulting extruded surface features.
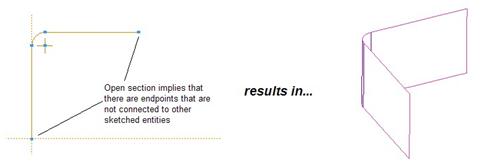
Open Section
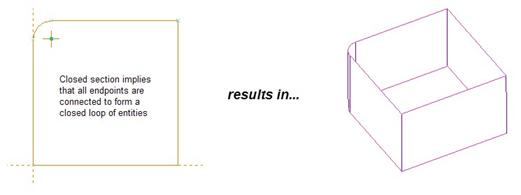
Closed Section
SLIDE-UP PANELS
Within the dashboard, we have some menus. These are called Slide-Up Panels, because, when you pick on the menu, a panel slides up to show the contents of that menu command. In the case of the extrude feature, there are three slide-up panels. These are: Placement, Options and Properties.
The Placement slide-up panel is used to define the sketch. We can see this in the figure below.
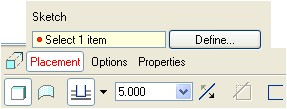
Instead of clicking on the Define button, we can also right-click out in the working window and select Define Internal Sketch.
The Options slide-up panel is used to define additional depth options, and behavior as the depth is applied. We can see this in the following figure.
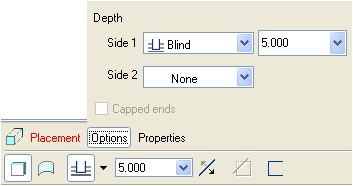
For a Blind depth, we have the ability to control the depth differently on either side of the sketching plane. For example, we could have the depth go through all in one direction, and up to surface in another.
The other option on this panel – Capped Ends – will be discussed shortly.
The third panel, entitled Properties, is used to rename the feature. The current name is shown below.

We can see that this feature will be called EXTRUDE_1. This is the name that appears in the model tree once we create the feature. We can edit it here to give it a meaningful name.
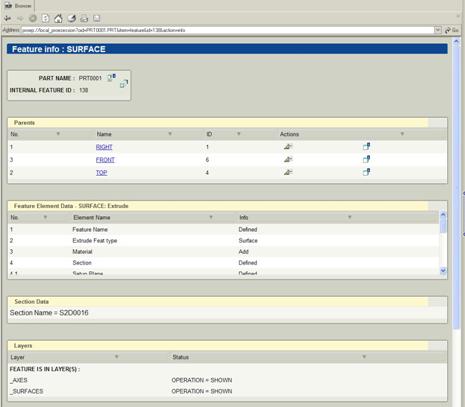
The little blue “I” next to the name field brings up an information window in the built-in web browser with information about this feature that we are creating (sort of a summary). It looks like the figure at the top of the next page.
CAPPED ENDS
When we create a surface that has a closed section, we can cap off the starting and ending surfaces of the feature. In the case of an extruded surface, this creates a surface on the sketching plane and at the end of the depth that have the profile of the sketch. The following figures show this last surface that we defined with the capped ends in a no hidden and shaded mode.
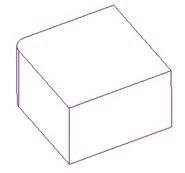
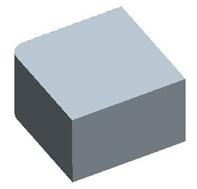
In shaded mode, the capped surface looks exactly like a solid protrusion, but in no-hidden mode, we can clearly see the purple and pink edges of the surface.
THIN OPTION
For either a solid or a cut, we can select the Thin option. This adds a thickness to the sketch when extruding. The thickness can be added to one side of the sketch or the other, or it can be added equally to both sides.
When we create the thin feature, we use the same methods that we have for the other extruded features. In the dashboard, we will select our main feature type (Solid or Cut), then pick on the Thin option icon. This will bring up another field to enter the thickness, and another arrow icon to define the side of the sketch the thickness will be added to.
The following figure shows the dashboard for a thin protrusion.

The dynamic preview shows us the thickness applied to the feature, as shown in the following figure.
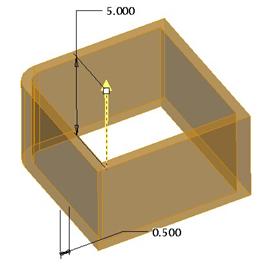
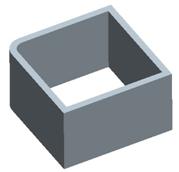
Use the arrow icon at the right end of the dashboard to see the different ways it applies the thickness (inside, outside, or equal about sketch). Once you have what you are looking for, accept the feature. It will look like the following.
LESSON SUMMARY
An extrude feature takes a sketched profile and adds depth in a single direction. You can create a Solid or Thin Protrusion, a Solid or Thin Cut, or a Surface in a single extrude command.
Be sure to check the reference plane and its orientation once you select a sketching plane. You don’t want any surprises in case it decides to pick a surface or orientation you weren’t expecting.
Use capped ends to close off the ends of a surface extrude, but only if you sketched a closed section.
EXERCISES
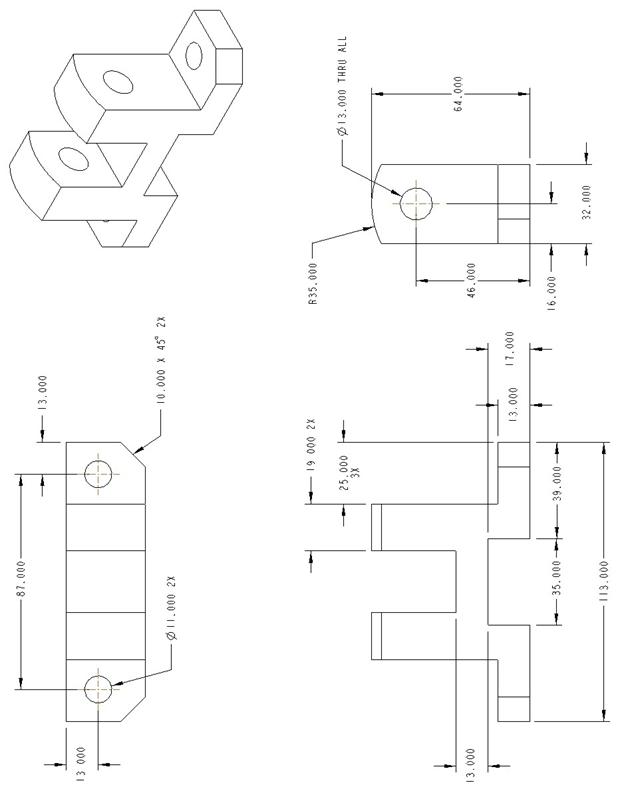
Using the extrude feature, create the following parts on the pages that follow. Be sure to use a start part for each separate part, and save your models when you are done.
Plate_Layout2.prt
Open up the Plate_Layout2 part. In this exercise, you will do the following:
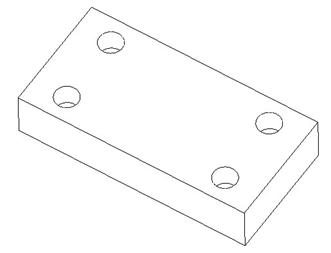
Create two extrude features – one for the rectangular plate, and one for the holes. The rectangular plate is extruded to a depth of 2.0 inches. The holes are only going to be extruded 1 inch into the plate – making them blind holes.
Use external sketches already in the model to create this part. The following figure shows the resulting model.
Save and close this model.
Safety Key – Finish this model that we already started in this lesson.
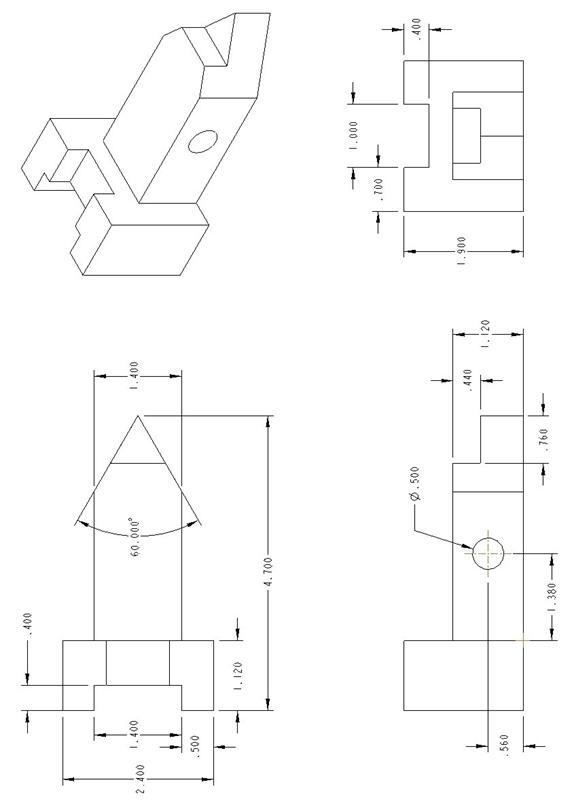
Rod_Support
